Try it on your own! Or just contact me and I'd be happy to do it for you!

Easter Wreath

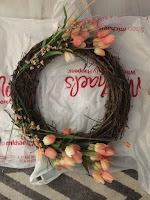


Easter Wreath
Materials needed: Natural wreath, flowers, burlap, hot glue gun and glue sticks, wire cutter, floral wire, and eggs

1. Start laying out your idea
*Remember if you're going to put a bow on the side you will be able to cover up the ends of the flower stems*

2. Grab you wire and hot glue to start putting things in place!

3. Check it out every so often.. make sure nothing will fall off.

4. Finalize your flowers and then add your burlap bow!

Lastly, if you're making this for the Easter season, grab some plastic eggs. They have cute ones at Michael's or if you have old ones around the house use those as they are or you can spray paint them!
And here's the finished wreath on our door for the Easter season!


Materials needed: foam wreath form, ribbon, flowers, wire, hot glue gun and glue sticks, wire cutter


1. START!
You need your foam wreath form and your ribbon. I bought 2 spools of ribbon that were both 3yd long and I had the perfect amount. To be safe, error on the side of having extra.. but 2 or 3 wide ribbon spools should be fine depending on the yardage.
I used hot glue to attach the end and then go ahead start wrapping it tight around the foam form.

2. Layout
Gather all your flowers and other materials and start playing with the layout. The flowers come off pretty easily from the stem so just carefully pluck them off. If you're having trouble- grab some wire cutters! I lay my wreath on the floor and just start playing around with where I want the flowers.

3. Start hot gluing!
Once you have a layout that you like, start hot gluing. Be sure to lift it up every once in a while to check how things are going.

4. Extra!
I could stop at this point and love it or now you could add house numbers, a bow, or an initial to the wreath. I chose the letter "c" and am so happy with the end product!
Here it is-the spring ribbon wreath on our door!

Give it a try- and you'll want to walk in your front door all the time!
Or contact me about purchasing one that I will make especially for you!
Burlap Wreath
This is one of my favorite wreaths and it happens to be the first one I ever made. Most importantly, before you begin, come up with a theme or find some inspiration. Your inspiration could be a picture of 3 or 4 wreaths that you like!
I started with just the wreath frame, floral wire, burlap, burlap and lace, hot glue, and my large letter "C".
To buy your supplies make sure you find a coupon for the best deal (Michael's, Hobby Lobby, or JoAnn's) and then go shopping!
I'll warn you, it takes time to get burlap to stay the way you want it.. but once you do, you'll fall in love with it!
Below is the finished product on our front door. I love to show it off in the spring and early fall.


I don't have it just in the middle of my floor like this photo.. it works nicely in the corner of our family room where we have some dead space. Don't be afraid to take something that has no "duty" in your eyes and take a chance on it!
I simply hit up Hobby Lobby when they were having a floral sale and had coupons. I got the color palette from our family room and I always have extra burlap around. Something like this can be a year round piece or have a different arrangement for each season!
Making wreaths are all about trial and error once you decide on a "theme" for the wreath.
For Christmas wreaths if you're looking for the best bargain, buy your supplies after Christmas to make it for the next year. Each piece in the wreath below are picks I bought from Hobby Lobby and chose to add to the base.

Here is one of my earliest DIY projects. I found this cozy coupe at Once Upon a Child for super cheap.

Sanitize or even take the garden hose to it! I put a tarp down so the hubbs wouldn't get upset about a red yard. :) Plastic shopping bags around the wheels work great!

My nephew's favorite character was Elmo.. so that was the cozy coupe's destiny! I spray painted foam and rubber forms (Michael's or Hobby Lobby) and hot glued them into place. For the mouth I simply used a thick black sharpie. (Please ignore our messy garage at the time)

No comments:
Post a Comment